We may want to save and later restore ESP8266 and ESP32 firmware that came with them and were installed from the factory. They will come handy later on when we are troubleshooting the ESP development boards for possible defects.
We need the software Esptool to do this. Esptool is based on Python and so we need to first install Python.
If you are using Windows and do not have Esptool installed yet, please see the article entitled How to Install Esptool on Windows 10.
Gathering the Board’s Info
To properly save and restore an ESP8266 or an ESP32 firmware, we must be sure on the size of the flash chip involved.
To gather the board’s info, run the flash_id command.
esptool.py flash_id
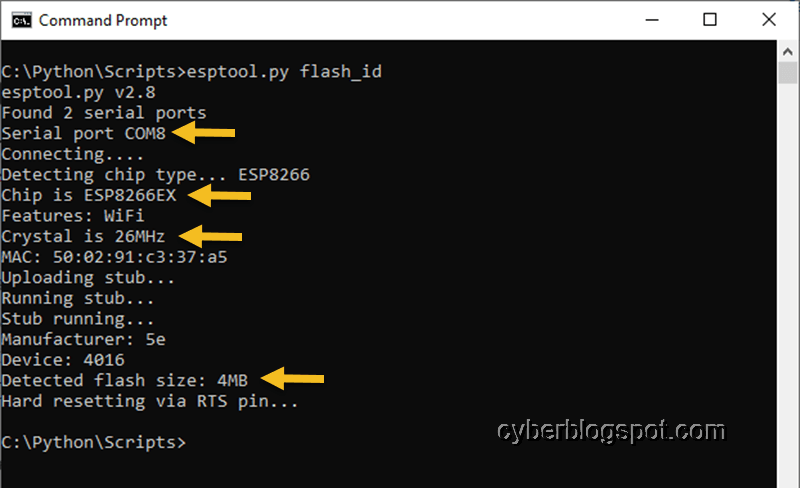
Notice that we did not specify the port where the development board is connected. Esptool was smart enough to scan the different ports. It found that the board was connected on COM8.
On the screenshot above, I highlighted the important information with an arrow. The most important info we need is the flash size, which, in this particular case, is 4MB.
Save 1MByte or 8Mbit Flash
The command for saving the firmware of an ESP8266 or ESP32 chip with a 1MB (8Mbit) flash chip is as follows:
esptool.py --baud 115200 --port COM8 read_flash 0x0 0x100000 fw-backup-1M.bin
–baud 115200, the baud rate of the data transfer
–port COM8, the communications port where the board is connected
read_flash, the specific command
0x0, the starting address of the flash memory to read in hexadecimal
0x100000, the size of flash memory to read in hexadecimal (1048576 or 1MB decimal)
fw-backup-1M.bin, file name of the saved firmware
Save 4MByte or 32Mbit Flash
When saving the firmware of a development board with 4MB (32Mbit) of flash chip, we adjust the memory size parameter on the command. Hexadecimal 0x400000 is decimal 4194304 or 4MB.
esptool.py --baud 115200 --port COM8 read_flash 0x0 0x400000 fw-backup-4M.bin
Restore 1MByte or 8Mbit Flash
esptool.py --baud 115200 --port COM8 write_flash 0x0 fw-backup-1M.bin
Restore 4MByte or 32Mbit Flash
esptool.py --baud 115200 --port COM8 write_flash 0x0 fw-backup-4M.bin
How to Save and Restore ESP8266 ESP-01 Module Firmware
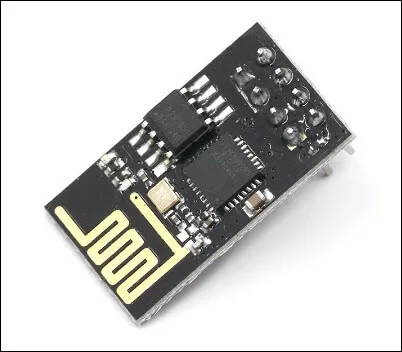
The ESP-01 module shown in Figure 2 is one of the most popular members of the ESP8266 family of Wi-Fi microcontrollers. A brand new ESP-01 module comes with an AT Firmware for programming the module. However, we sometimes prefer to program it using the Arduino IDE, NodeMCU, or Micropython. In all those cases, the original AT Firmware gets overwritten. Therefore, it is wise to save the original firmware that comes with it, just in case we run into problems and we decide later on to restore the original AT Firmware.
Did you know that there are two (2) versions of ESP-01 modules ? Check out:
Difference Between ESP-01 and ESP-01S
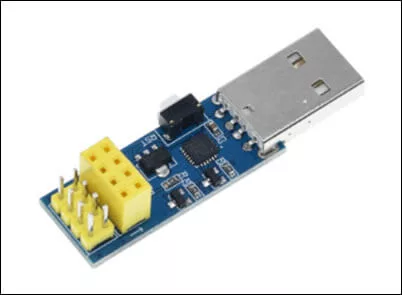
To save and restore the ESP-01 module firmware, we need a programmer module similar to the one shown in Figure 3 below.
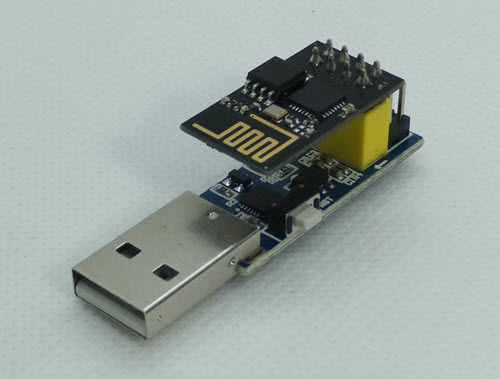
Insert the ESP-01 board to the programmer module (see Figure 4). Then plug the programmer to the USB port of your computer.
Let us first check the original AT Firmware and also verify if we have a working ESP-01 module.
Open the Arduino IDE and set the appropriate COM port for your ESP-01 programmer. Then, open the Serial Monitor. Set the line ending setting to “Both NL and CR” and the baud rate to 115200. See Figure 5 below.
Type in the AT command “AT”, and you should receive the message “OK”, indicating that the ESP-01 module is responding to AT commands.
Type in “AT+GMR”, and the ESP-01 module should respond with the version number of the AT Firmware together with the version number of the SDK (Software Development Kit). See Figure 5.

Close the Arduino IDE serial monitor and open a command prompt. Check the memory size of the ESP-01 module.
esptool.py flash_id

Based on the previous discussion above, the command for saving the firmware of an ESP-01 module is:
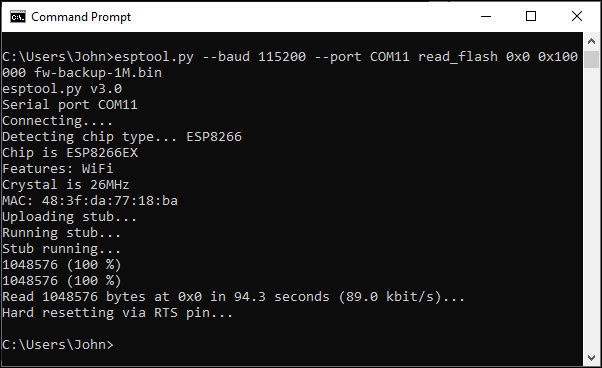
esptool.py --baud 115200 --port COM11 read_flash 0x0 0x100000 fw-backup-1M.bin
To restore the original firmware of the ESP-01 module using the saved firmware, use the following Esptool command:
esptool.py --baud 115200 --port COM11 write_flash 0x0 fw-backup-1M.bin
Related Articles on How to Save and Restore ESP8266 and ESP32 Firmware
How to Test NodeMCU V3 Using Esptool
How to Install Arduino IDE on Windows 10
How to Set up Arduino IDE for ESP8266 Programming
How to Install Esptool on Windows 10
NodeMCU V3 ESP8266 Pinout and Configuration
NodeMCU ESP-32S Pin Configuration
How to Use MCP4725 Module with Arduino
How to Use ADS1220 ADC Module with Arduino
References on How to Save and Restore ESP8266 and ESP32 Firmware
ESP8266 on Wikipedia
ESP32 on Wikipedia
Esptool Wiki
Super helpful! I was able to backup my esp32.
Thanks!
Awesome!
Super
Danke!
Great! I dump dlash from Sinikink wifi module XY-WFPOW
Size flash 2MB 🙂
Hello,
I’m trying to use esptool on a Sinikink XY-WFPOW using lateral pin holes.
How to put XY-WFPOW programming mode?
Helpfull, Thank you !
But works for me without the “.py” in python 3.11, and the 500K baud is faster:
esptool –baud 500000 –port COM4 read_flash 0x0 0x400000 fw-backup-4M.bin
I have a ESP32 S3 with 16MB flash size, can anyone give me guidance on how to write the code to download this flash size? thanks