Have you been locked out of your BLU smartphone after a reset to factory settings? You have come to the right web page. I will show you how to unlock a BLU phone verification after you reset the phone to its factory settings.
Why Does BLU Smartphone Lock Us Out?
A reset to factory settings is a way of deleting the phone’s contents and starting a new fresh installation. You do this before selling, passing down, or merely giving away the phone. Also, if you lost your phone or someone stole it, you need to reset the phone to its factory settings to delete and secure your personal data.
There are two ways of resetting an android phone to its factory settings. First, when you still have the phone in your possession, you can go to the phone’s Settings and initiate the reset there. And second, when you do not have a physical access to the phone, you reset the phone thru the Internet. In this case, you use Android Find My Device.
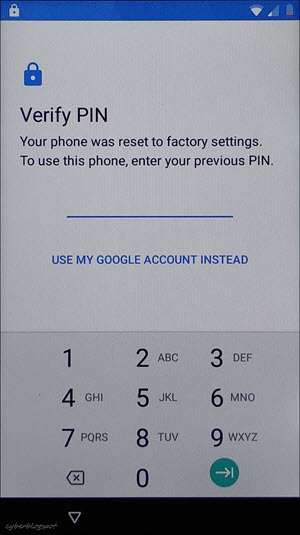
In the first case, because you used the phone itself to reset it, it will not lock you out of the phone. It is presumed that you know the PIN and/or the Google account for the phone. In contrast, in the second case where you reset your phone thru the Android Find My Device application, it is assumed that your phone was lost or stolen. Hence, the need for a Factory Reset Protection (FRP) verification to prove your ownership of the phone.
To sum up, when you reset an Android phone into its default factory settings using Android Find My Device, it will ask you for your PIN or a Google account previously used on the phone.
Outline for Unlocking BLU Verification Lock After Reset to Factory Settings
Since bypassing the Factory Reset Protection (FRP) is a drawn-out process, let us briefly outline the procedure.
The technique used to unlock a BLU smartphone verification after a reset to factory settings is to install a third party FRP bypass application. There are many similar FRP bypass apps but we will be using the application from hardreset.info.
But how do you install an app on a locked phone? First, we must trick the phone to open a Chrome browser. Then, we go to the FRP bypass app’s website and download the bypass app. Afterwards, we run the bypass app and provide an email account. Finally, we reboot the phone.
When the phone reboots, the setup can now be completed, sans FRP verification. The FRP bypass app automatically inserts the email account previously provided. As a result, the setup program will not ask for a PIN or Google account anymore.
The final step is to reset the phone again to its factory settings. This will remove the installed third party FRP app, giving us a fresh installation. Since the reset to factory settings was done thru the phone and not thru the Find My Android app, the phone will not require a factory reset verification anymore.
Step by Step Guide to Unlock BLU Verification Lock After Reset to Factory Settings
Step 1 – Connect to a Wi-Fi network
First of all, we need to have an internet connection. Connect to any available Wi-Fi network of which you know the passphrase or password. Follow the following procedure.
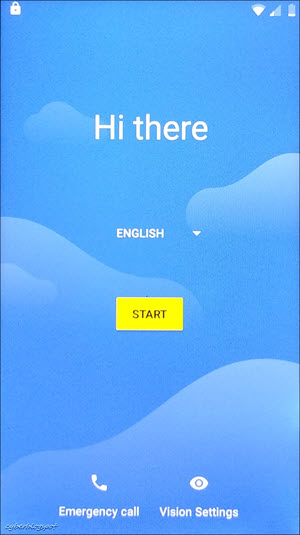
Tap on the yellow START button of the welcome screen.
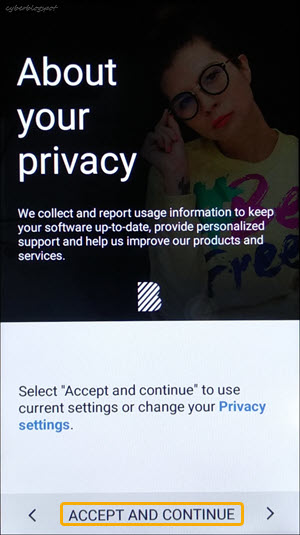
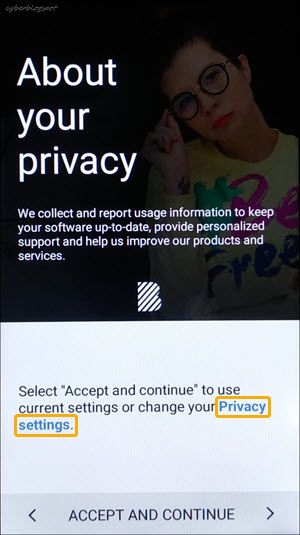
On the About your privacy screen, tap on the link ACCEPT AND CONTINUE.
When the Connect to Wi-Fi screen shows up, hit the See all Wi-Fi networks.

Then, select the SSID or Wi-Fi name of the network you want to connect to.

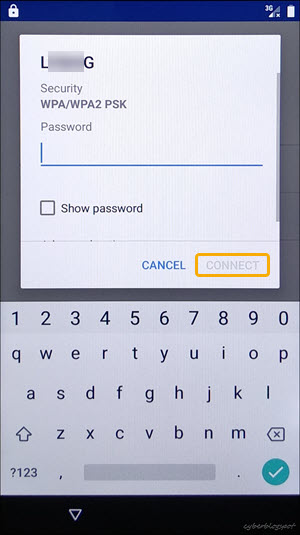
Now, type in the Wi-Fi password or passphrase in the password screen. Afterwards, tap on CONNECT.
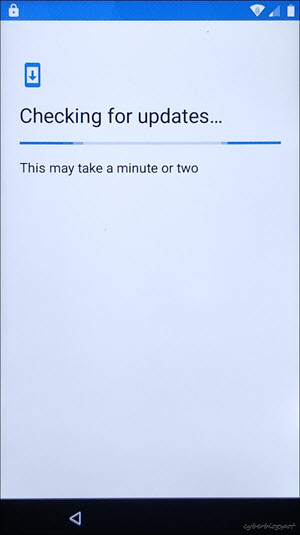
Right after connecting to a Wi-Fi network, a screen with a message saying “Checking for updates, this may take a minute or two” will appear. The phone is checking the Internet for any updates and may take a while if it finds and downloads any patches. Otherwise, it should go directly to the next screen.
After the update check, you should see the screen shown below. Now, press the triangular BACK button twice, or until you get to the starting “Hi there” screen.

Step 2 – Trick BLU smartphone to set up and open a Google Chrome internet browser
The phone is currently locked. Hence, if we want to install an application from the Internet, we need an access to a Chrome browser. Let us now trick the phone to open a Chrome internet browser.
At the starting screen, again tap on the yellow START button.
The Privacy screen shows up again. This time, press the blue Privacy settings link.
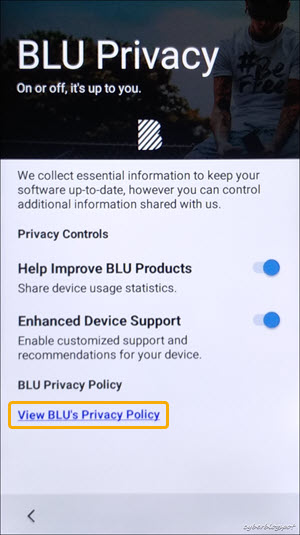
On the BLU Privacy screen, tap the link View BLU’s Privacy Policy.
Then, on the BLU Privacy Policy Terms and Conditions screen, tap on the BLU Licensing agreement link. Or simply scroll the screen up.
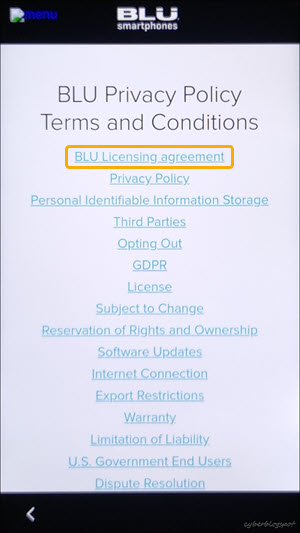
You should see a bunch of text explaining BLU’s Terms and Conditions.
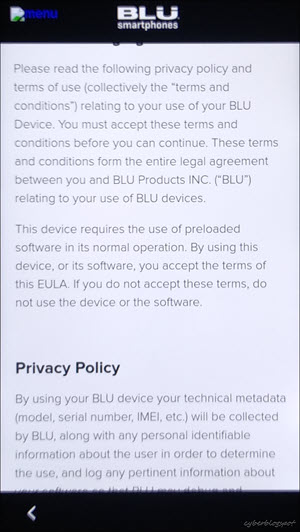
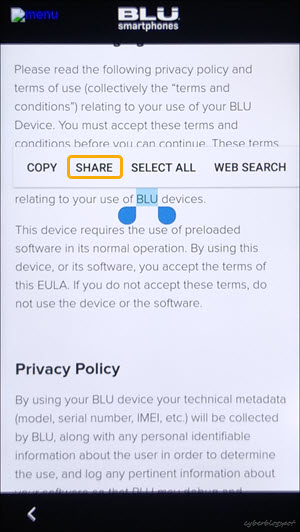
Press and hold down on any of the text on the screen. Lift your finger up as soon as you see a pop-up menu appearing. Then, tap on the SHARE link of the menu.
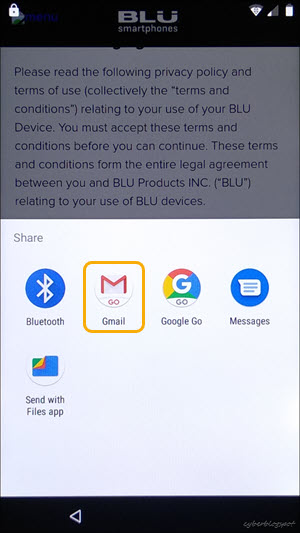
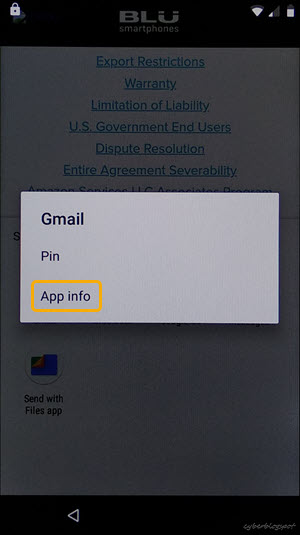
In the Share screen that follows, long press the Gmail option. That is, press and hold down the Gmail icon until a pop-up menu shows up.
In the Gmail menu that pops up, select App info by tapping on the link.
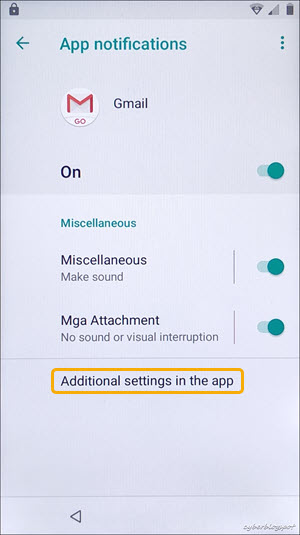
On the App info screen, tap on App notifications.

Now, when the App notifications comes up, tap on the link Additional settings in the app.
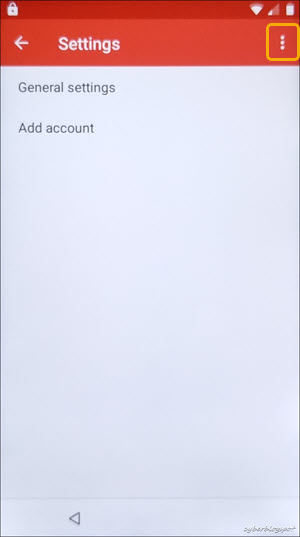
What follows is the Settings screen. On the far right side of the word Settings is a column of dots or a vertical ellipsis. This is a “more options” menu icon. Tap the icon.
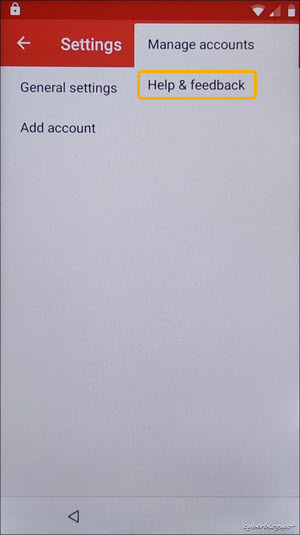
On the newly opened menu, select Help & feedback by tapping on the item.
Step 2 Continuation
After tapping the Help & feedback option, you should see a Support screen. Take note of the search box where it says “Describe your issue”.
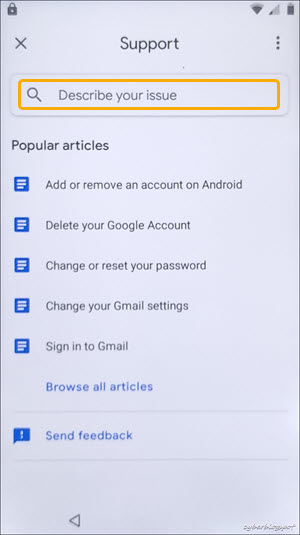
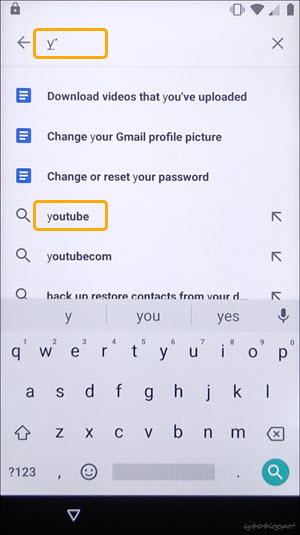
Tap on the search box and type the letter “y” (we are searching for “youtube”). There is no need to type the whole word “youtube” because the word will automatically appear on the search list below the search box. Now, tap on the word “youtube”. Please see the illustration screenshot below.
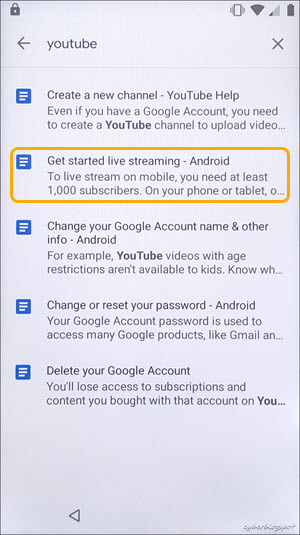
On the YouTube search results, tap the second result: “Get started live streaming – Android …”.
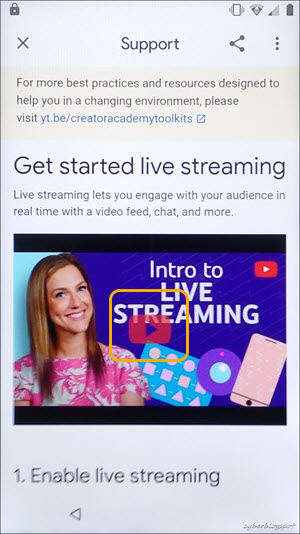
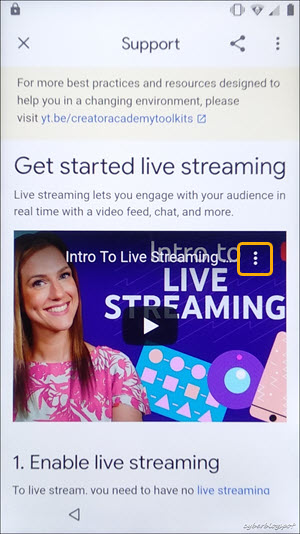
On the next screen, click the play button on the video “Intro to LIVE STREAMING”.
Tapping on the video play button will not start the video. Instead, the small play button at the top right of the video becomes a vertical ellipsis. The vertical ellipsis indicates more options. Tap on the vertical ellipsis icon.
On the next screen, select Watch later.
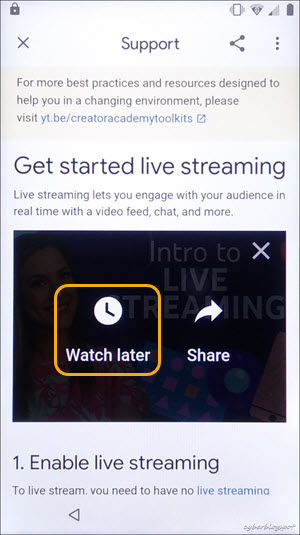
PRESTO!!!
After tapping on the Watch later option, we now have the Google Chrome Welcome screen! Let us now complete the Google Chrome setup.
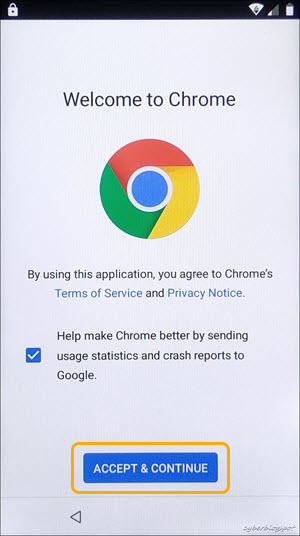
On the Welcome to Chrome screen, tap on the blue ACCEPT & CONTINUE button.
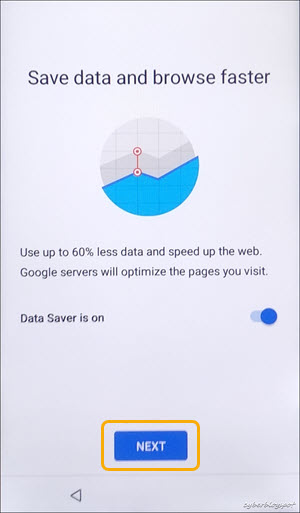
On the Save data and browse faster screen, tap on the blue NEXT button.
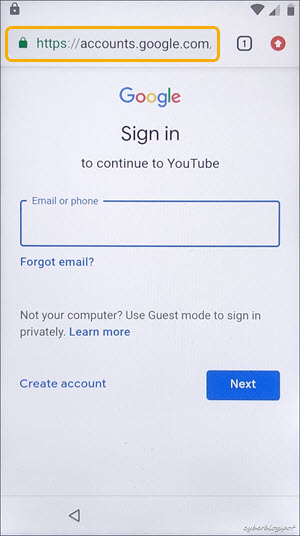
Finally, we now have our most coveted Google Chrome internet browser, all ready to go. Take note of the highlighted item in the screenshot below. I highlighted the most important thing that we need for the next step – the Google Chrome’s address bar.
Also, we do not need to sign in for now. We can go now directly to the next step: downloading the FRP Bypass app from hardreset.info.
Step 3 – Downloading the FRV bypass app
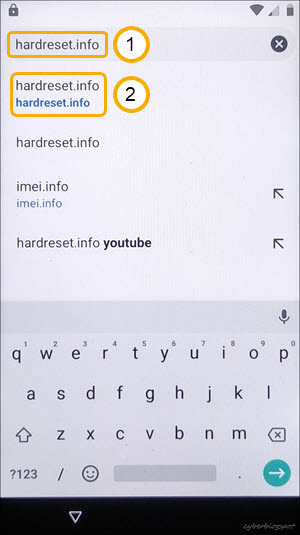
From the open Chrome browser from the last step above, tap on the browser’s address bar. A screen similar to the screenshot below should appear.
First, type “hardreset.info” on the address bar. Then, click the hardreset.info link.
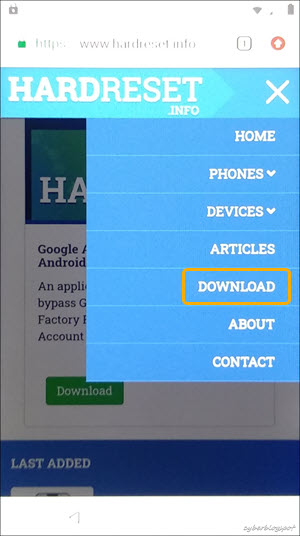
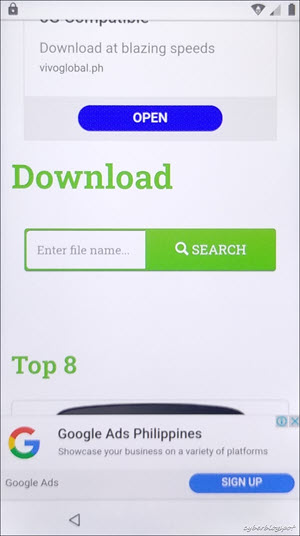
Right after tapping the hardreset.info link, you should see the main page of the website. On the right side of the site’s title is a hamburger menu, or options menu. Tap on the hamburger menu icon.

Tapping on the site’s hamburger menu icon opens a menu as shown in the screenshot below. Select the item Download by tapping on the item.
The following screenshot is the hardreset.info’s download page.
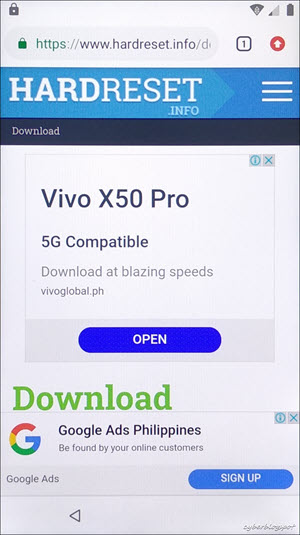
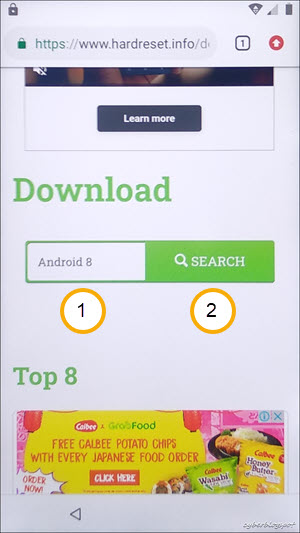
Scroll up the page and look for the search box.
On the search box, first, type the word “android 8”. Then, tap on the green SEARCH button.
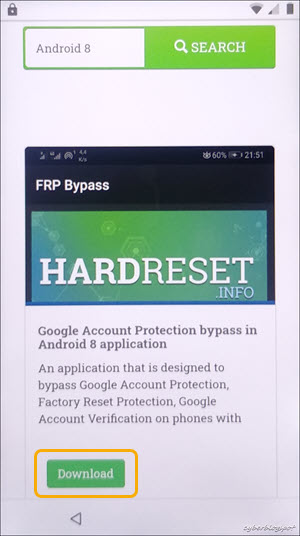
After tapping on the SEARCH button, the result should show the FRP Bypass app. Tap on the green Download button.
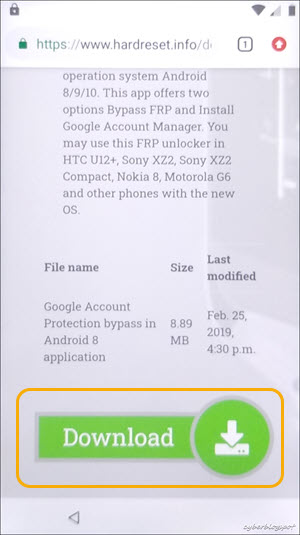
After tapping on the Download button, the app does not download immediately. Instead, another screen shows up detailing the app’s features and specifications. Scroll the screen up to find the new Download button. To start the file download, tap on the Download button again.
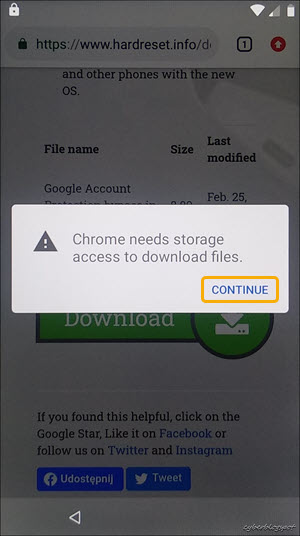
A message appears saying “Chrome needs storage access to download files”. Tap CONTINUE.
Next, a message asking permission to “Allow Chrome to access photos, media, and files on your device?” Tap Allow to grant Chrome the permission.

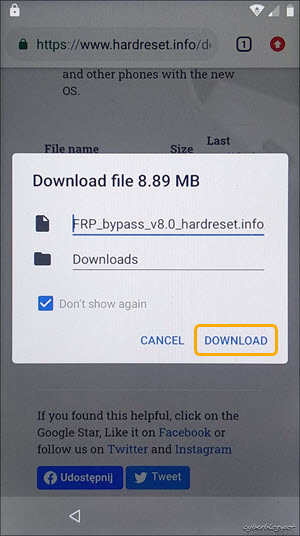
Another message asks for confirmation to download the file of FRP bypass app. Confirm by tapping on the Download button.
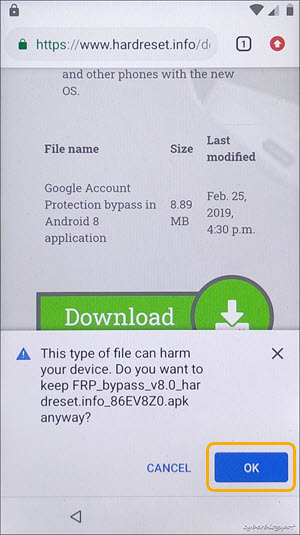
Then, another warning message that the file to be downloaded may be harmful. Tap on the blue OK button to start downloading the file.
Important Note:
Do not be afraid that the file may be harmful. It is true that we will be installing and running a possibly harmful application. But once the phone is unlocked, we will do another factory reset. As a result, we will have a fresh installation with the FRP bypass app eventually removed from the system.
When a message pops up saying the file has been downloaded, tap on the OPEN link.

Step 4 – Installing the FRP Bypass app
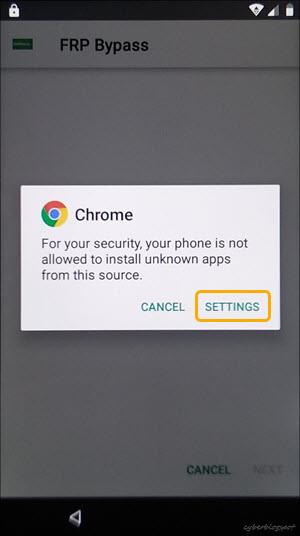
By default, an Android phone only installs apps coming from the Google Play Store. Therefore, when we try to install the FRP Bypass app, we get a message saying that the phone is not allowed to install the unknown app. However, we can change the phone’s settings to allow us to install the FRP bypass app. So, in the next screen, as illustrated by the screenshot below, tap on SETTINGS.
In the Install unknown apps screen, tap on the text Allow from this source. You should see the switch flip from the left side to the right side. Also, the switch color should change from gray to green. Then, tap on the triangular BACK button at the bottom of the screen.

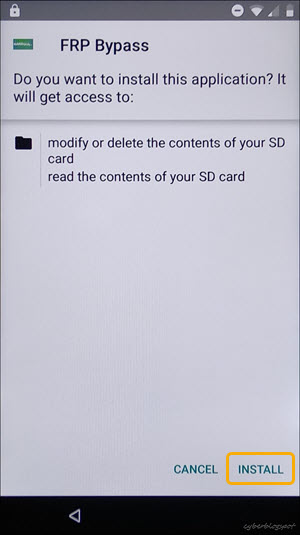
After tapping on the BACK button, we get another message warning us that the application FRP Bypass will be given access to our phone’s SD card. Select or tap on INSTALL.
At last, we get the confirmation that the FRP Bypass app has been successfully installed. Tap on the word OPEN and we will go to next phase: running the FRP Bypass application.

Step 5 – Running the FRP Bypass Application (unlock BLU verification after reset)
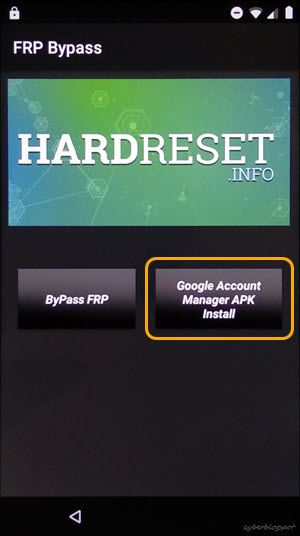
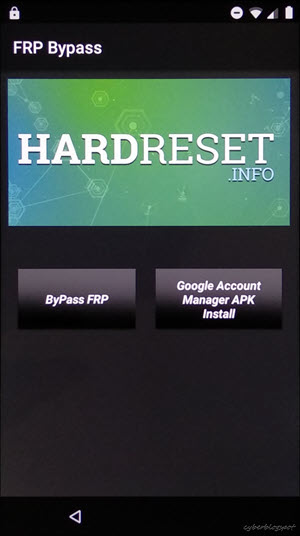
Selecting OPEN on the last step above, you should see the main screen of the running FRP Bypass app.
We need to install the Google Account Manager APK. To do this, tap on the button on the right side labelled “Google Account Manager APK”. Refer to the screenshot below.
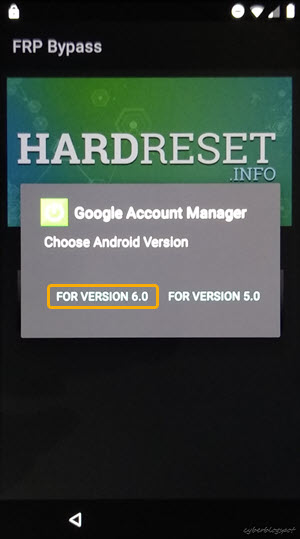
On the next screen, Choose Android Version, select FOR VERSION 6.0.
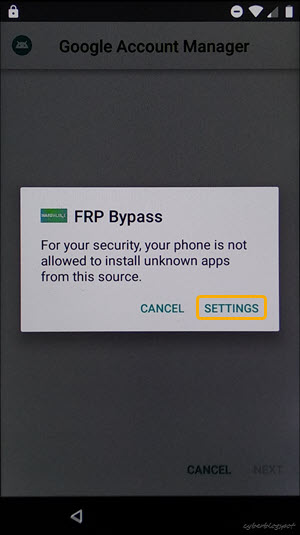
In the security message that pops up, select SETTINGS.
In the Install unknown apps screen, first tap on the on/off switch labelled Allow from this source. Turning the switch on will flip the switch to the right. Additionally, the switch color changes from gray to green. Then, tap the triangular BACK button. You may refer to the screenshot illustration below.
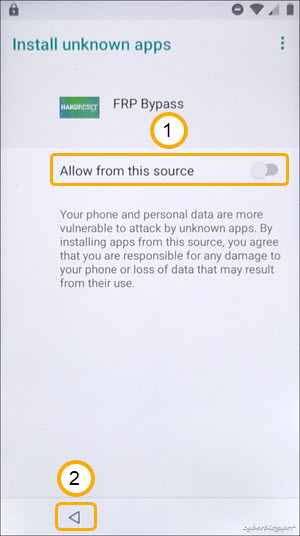
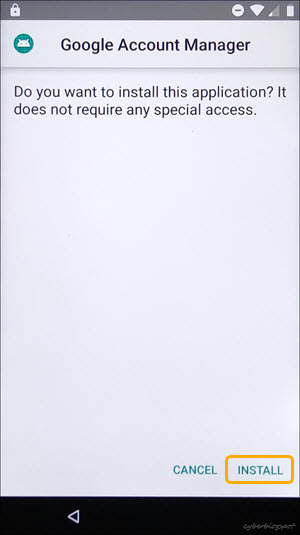
Step 5 Continuation
After tapping on the BACK button, a final message will indicate that the Google Account Manager APK that is about to be installed does not require any special access permission. Tap on INSTALL to begin the installation process.
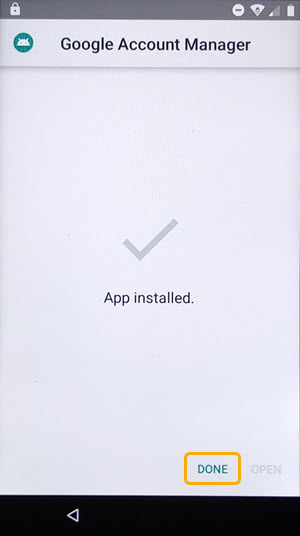
Finally, we get a message confirming the successful installation of the Google Account Manager. Tap on the DONE button.
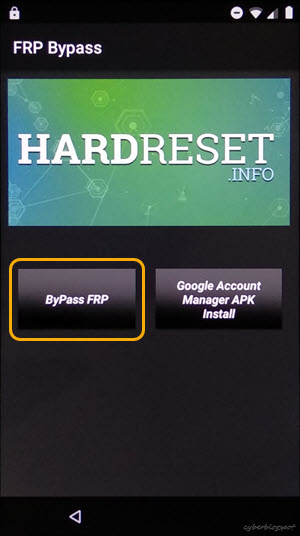
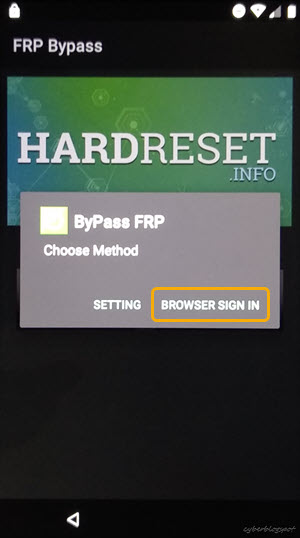
Now, you should be back to the main screen of the FRP Bypass app. This time, tap on the first button, the ByPass FRP button.
Bypass FRP will ask you to choose a bypass method. Select BROWSER SIGN IN.
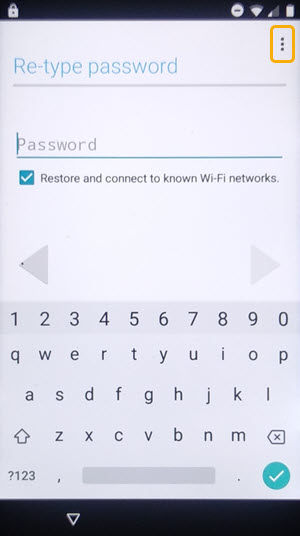
On the next screen, FRP Bypass is asking for a password. Since we want to use a new Google account, tap on the vertical ellipsis on the top-right side of the screen.
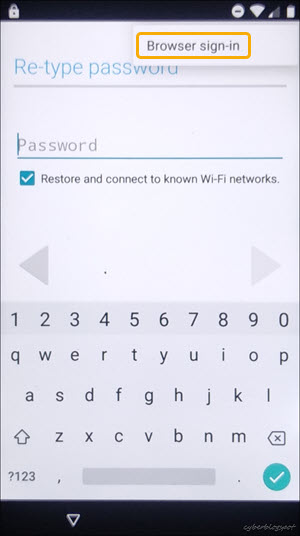
Then tap on Browser sign-in.
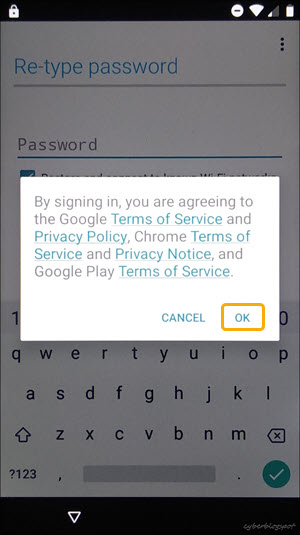
A message is displayed explaining that if you sign in, you are bound with the Google Terms of Service (TOS) for its different services. Tap on OK.
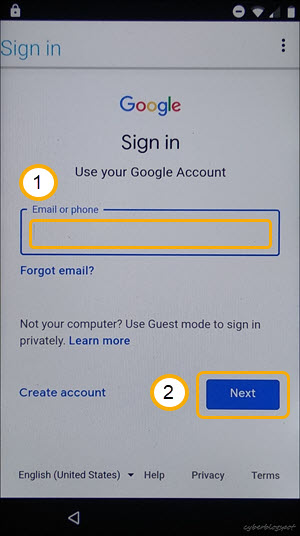
After agreeing to Google’s TOS, you are presented with a Sign in screen. First, enter a valid Gmail account. Then, tap on the Next button.
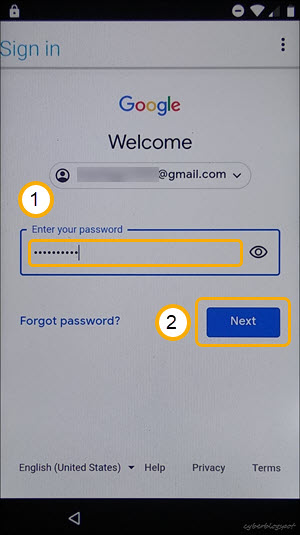
When you get into the Google Welcome screen, type in your email password. Then, tap on the Next button.
When you successfully sign in to your Google account, ByPass FRP returns you to the main screen of FRP Bypass app. At this point, you have succeeded in downloading, installing, and running the FRP Bypass application.
Step 6 – Reboot and set up the unlocked phone
Now, it’s time to reboot. Press the power switch at the side of the phone and select Reboot.
In the starting screen, select your language and tap on the yellow START button.
When the About your privacy screen shows up, tap on ACCEPT AND CONTINUE.
In the Copy apps & data screen, select Set up as new.

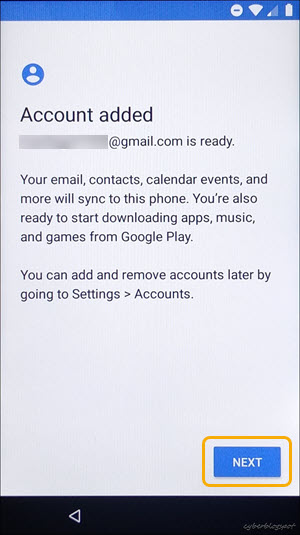
Take note of the next screen. It says Account added followed by the email address that we provided to FRP Bypass app prior to the phone’s rebooting. Also, take a look at the top leftmost part of the screen. The previously ever-present LOCK ICON disappeared. The phone has been UNLOCKED!!! This must be the work of the FRP Bypass app. Tap on NEXT button.
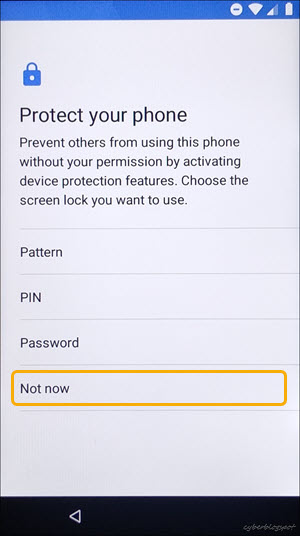
Now, we are at the Protect your phone screen. You may enter a PIN, password, or a pattern but I suggest that you select Not now. The reason is that this is just a temporary installation. We will do another factory reset once the phone has been successfully unlocked. As a result, everything that we set up here now will eventually be erased.
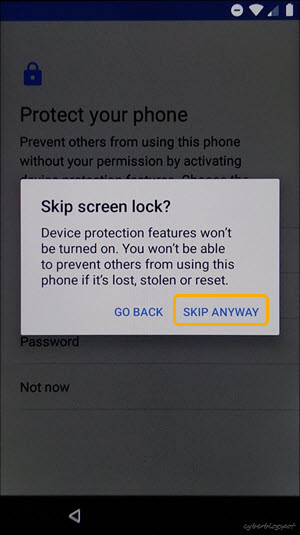
On the Skip screen lock? message, select SKIP ANYWAY.
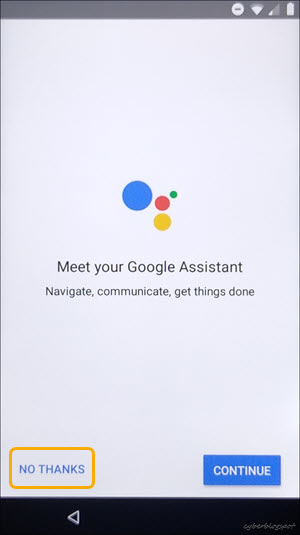
Answer NO THANKS on the next screen about Meet your Google Assistant.
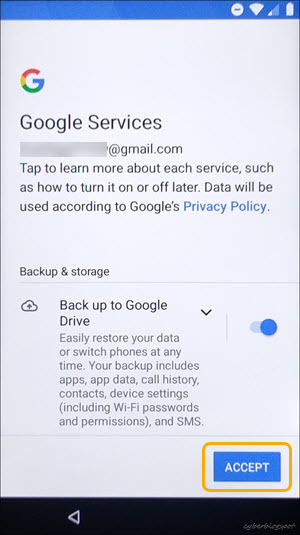
On the Google Services screen, scroll up to view the bottom part of the screen. Tap on the ACCEPT button once it shows up.
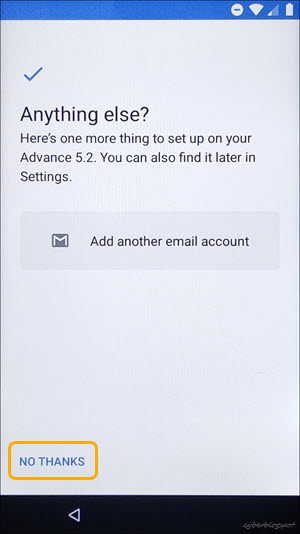
On the question, Anything else?, I would say NO THANKS.
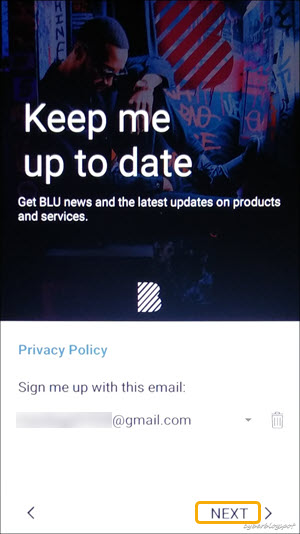
On the Keep me up to date screen, tap NEXT.
Again, in the Be the first to know screen, tap on NEXT.

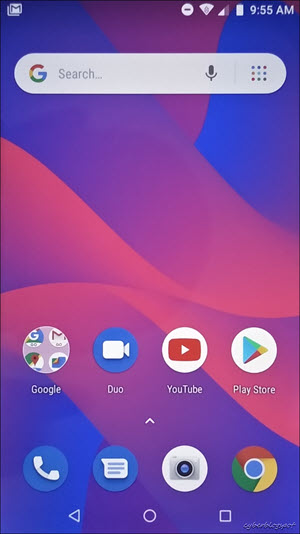
Finally, we have the home screen of an unlocked BLU smartphone.
Step 7 – Reset the phone to Factory Settings
The final step to unlock BLU verification after reset to factory settings is to perform a new reset to factory settings. This is a necessary step to make sure we have a new and fresh installation. The final step will remove the FRP Bypass app that we downloaded, installed, and subsequently ran.
To perform a new factory settings reset, go to Settings/System/Reset options/Erase all data (factory reset). Then tap on the RESET PHONE button. Lastly, tap the ERASE EVERYTHING button.
When the phone restarts, you will have a totally unlocked phone, ready for a new and fresh installation.
Related Articles on Unlock BLU Verification After Reset to Factory Settings
How to Reset Globe Router to Defaults
How to Reset PLDT Router to Defaults
Default Username and Password of Globe Router
Default Username and Password of PLDT Routers 2019
References on Unlock BLU Verification After Reset to Factory Settings
Bypass Google Account Verification on Android Devices
My doesn’t work
Did not work! Does not show privacy screen after start page??
Thank you so much for this helpful post! I was really frustrated trying to unlock my BLU phone after resetting to factory settings. Your steps were easy to follow and it worked like a charm.